Thursday, March 31, 2011

Provident Living Class: Gardening


On Tuesday, OSU Extension Agent Ross Penhallegon spoke to us about gardening in the Willamette Valley.

He spoke of four vital areas to consider while gardening:

1. Soil
2. Sun
3. Water
4. Fertilizer

Soil - Ross spoke of the tried and true way to test your soil. Dig a hole about 1 ft deep. Take a handful of soil in your hands, and squeeze it into a ball. If it crumbles and falls apart, you've got loam-based soil. The good stuff. If it forms a solid ball that's slick, you've got clay-based soil, in which case you'll want to add as much organic matter as possible - but avoid sand. If you add sand to clay-based soil, you'll wind up with adobe brick. Great for villas, bad for veggies. For a more in-depth discussion on soil and at-home soil testing, view this article from About.com.

Sun - It's best to plan your garden before planting. Visit this site for sample garden plans. One of the main things to consider while planning is light. You want to plant taller plants (like corn) on the north side of the garden to prevent them from shading other plants as the sun moves across your land. 

Water - In the Willamette Valley, we run a lower risk of having to stress too much about water. Generally speaking, and with a good layer of mulch, you should only need to give your garden a good soaking once or twice a week. View this article from OSU Extension on watering. One of the main things to avoid is giving your garden frequent, shallow waterings. It's important to let the water reach the roots where it does the plant real good.


Fertilizer - There is SO much information out there about fertilizer. Where in the world do you even begin? Right here, of course! Read this article from OSU Extension on fertilizer. Ross' main point about fertilizer is that it has one objective: to feed the plant. There are many, many discussions/arguments on what fertilizer to use, whether you go organic or chemical, etc etc. Your main goal is to feed the plant, which ever way you may choose.

As a side note, we are about 4 weeks behind in the Willamette Valley because of the moisture we've been experiencing. Surprise, surprise. : )

If you don't have anything in the ground yet, don't feel bad. If you haven't even looked in the direction of your garden plot, you still have time. If you don't even have a garden plot, all is not lost!! Start simple, start now. 

Also, check out this series of great articles from OSU Extension on growing your own vegetables:

"Growing Your Own Vegetables"

Wednesday, March 30, 2011

Provident Living Newsletter: April 2011


 If you or your friends/family who would like to receive this newsletter via email, please send me a message (laura.s.cherry@gmail.com) with their address. Thanks!

Provident Living Newsletter
_____________________________________

Upcoming Events:
4/12   Provident Living Class: Food/Herb Preservation 7pm @ the LDS Building - 525 66th Street in Springfield
4/10   Dry-Pack Sign-Up Deadline
4/14   Dry-Pack Canning Session 6pm @ the Thurston Grange - 6590 Thurston Road (If you would like to order for this, see info below)

Group Buy - Each month, Emergency Essentials offers food/supplies for a discounted price if you meet a minimum amount as a group. These items include freeze-dried foods, first-aid supplies, survival supplies, etc. If you would like more information on this, visit the "Group Buys" post on the blog. Each month I will provide the list of items, and if you would like any of them, just shoot me an email. The best part about this is that we get FREE SHIPPING on all Group Buy orders. That's HUGE!! It's a great way to increase your supply and save money at the same time!!

Dry-Pack Canning -
Each month, we borrow the dry-pack canner from the Bishop's Storehouse. With this canner, we can seal foods/supplies in Number 10 cans, making them ready for long-term storage. We offer 3 items each month (i.e. this month we're canning dry milk, granulated sugar, and white rice) or you can bring anything you purchase on your own to the grange, and - working together - we'll put it into cans. I purchased gold fish and animal crackers this month so I can have some on hand for my son as he grows, so I'm going to be bringing those bags to the grange to put into cans. It's amazing what you can put in Number 10 cans!!

If you'd like to purchase one of the 3 items offered this month, you just need to let me know how many cans of each you would like. (Side Note: 6 cans fit into 1 cardboard carrying box)

APRIL ITEMS:
 

***Prices have been updated to reflect the Storehouse price increase on 4-1-2011***
 
Rice, White            $4.50/can
Milk, Nonfat Dry   $8.87/can
Sugar, Granulated   $6.30/can

***Prices include one the item, 1 oxygen absorber (no oxygen absorber in sugar), 1 metal can, and 1 metal lid. If you would like a box and/or plastic lids, you will need to purchase them.

PURCHASING EMPTY CANS:
If you are bringing your own items to can, you will need to purchase empty cans. We sell them by the case, and even if you can give me an estimate on how many cans you will need, we'll be able to change the amount at the Grange, once you know how many you actually used. (For a reference: 25 lb bags of sugar, salt, etc. usually fit into 5-6 cans)

A case of cans costs $7.15 and it includes the following:

-6 cans
-6 metal lids for sealing
-6 oxygen absorbers (if you don't need oxygen absorbers, we will adjust the price for you)
-2 plastic reusable lids (to be used after opening the cans)
-1 cardboard box

Again, if you would like to sign up for any of these items, email me. The ORDER DEADLINE FOR APRIL IS SUNDAY, APRIL 10th!
Provident Living Classes -
Provident Living Classes will be held monthly for the rest of the year. If you have suggestions for classes you would like to see, feel free to email me with your ideas. All classes, unless otherwise specified, will be held at the Church of Jesus Christ of Latter-day Saints building on 66th Street in Springfield. These classes are open to church members, community members, youth, etc. All are welcome! We will update you on upcoming classes as soon as we have them finalized!


Self-Reliance Blog -

Don't forget to check out the Self-Reliance Blog. If I can get my rear in gear, you will be able to see the following themed posts, as well as other informational posts several times a week!

Ethleen's Eat of the Week - Learn how to use your food storage in delicious recipes your entire family will love! It's not enough to keep the food, we must rotate and replace! Ethleen's Recipes are a great way to do that!
Danae's Deal of the Week - Our savvy-super-saver-shopper Danae will be providing us with some of the best deals for grocers in our area! We will also be posting links to online coupons in this section.
52 Weeks to Family Preparedness - The 52-Week Plan is designed to help families become better prepared in just 52 weeks! At the end of this course, you will have a year's supply of food, 72-Hour Kits for the entire family, Car Emergency Kits, and your family will be better prepared physically, emotional, and spiritually. They are listed by week. If you have any troubles viewing them, let me know.


As always, if you have ideas, questions, comments, or concerns, feel free to let me know!! 


--
Laura S. Cherry http://saintsforselfreliance.blogspot.com "It's better to have this and not need it than it is to need it and not have it..."

Monday, March 28, 2011

REMINDER: Provident Living Class - GARDENING

REMINDER: FREEEEEEEEE Gardening Class TOMORROW NIGHT!!!! The legendary Ross Penhallegon will be teaching us all about what to plant/when to plan for our area!! 7:00 p.m. at The Church of Jesus Christ of Latter-day Saints Building - 525 66th Street in Springfield. Message me if you need directions! These free gardening classes will be happening monthly for the rest of the year!!!!!! ♥

Wednesday, March 16, 2011

Emergency Preparedness: Earthquake Prep Checklist

 You can find loads of disaster prep information on the FEMA site - including the "Earthquake Checklist" - see it below for ideas on what you can do to prepare now for an Earthquake in your area!   

What to Do Before an Earthquake

Earthquakes strike suddenly, violently and without warning. Identifying potential hazards ahead of time and advance planning can reduce the dangers of serious injury or loss of life from an earthquake. Repairing deep plaster cracks in ceilings and foundations, anchoring overhead lighting fixtures to the ceiling, and following local seismic building standards, will help reduce the impact of earthquakes.

 6 Ways to Plan Ahead:
  1. Check for Hazards in the Home
    • Fasten shelves securely to walls.
    • Place large or heavy objects on lower shelves.
    • Store breakable items such as bottled foods, glass, and china in low, closed cabinets with latches.
    • Hang heavy items such as pictures and mirrors away from beds, couches, and anywhere people sit.
    • Brace overhead light fixtures.
    • Repair defective electrical wiring and leaky gas connections. These are potential fire risks.
    • Secure a water heater by strapping it to the wall studs and bolting it to the floor.
    • Repair any deep cracks in ceilings or foundations. Get expert advice if there are signs of structural defects.
    • Store weed killers, pesticides, and flammable products securely in closed cabinets with latches and on bottom shelves.

  2. Identify Safe Places Indoors and Outdoors
    • Under sturdy furniture such as a heavy desk or table.
    • Against an inside wall.
    • Away from where glass could shatter around windows, mirrors, pictures, or where heavy bookcases or other heavy furniture could fall over.
    • In the open, away from buildings, trees, telephone and electrical lines, overpasses, or elevated expressways.

  3. Educate Yourself and Family Members
  4. Have Disaster Supplies on Hand (For ideas on an Emergency Kit see the "72-Hour Kit" Post)
    • Flashlight and extra batteries.
    • Portable battery-operated radio and extra batteries.
    • First aid kit and manual.
    • Emergency food and water.
    • Nonelectric can opener.
    • Essential medicines.
    • Cash and credit cards.
    • Sturdy shoes.

  5. Develop an Emergency Communication Plan
    • In case family members are separated from one another during an earthquake (a real possibility during the day when adults are at work and children are at school), develop a plan for reuniting after the disaster.
    • Ask an out-of-state relative or friend to serve as the "family contact." After a disaster, it's often easier to call long distance. Make sure everyone in the family knows the name, address, and phone number of the contact person.

  6. Help Your Community Get Ready
    • Publish a special section in your local newspaper with emergency information on earthquakes. Localize the information by printing the phone numbers of local emergency services offices, the American Red Cross, and hospitals.
    • Conduct a week-long series on locating hazards in the home.
    • Work with local emergency services and American Red Cross officials to prepare special reports for people with mobility impairments on what to do during an earthquake.
    • Provide tips on conducting earthquake drills in the home.
    • Interview representatives of the gas, electric, and water companies about shutting off utilities.
    • Work together in your community to apply your knowledge to building codes, retrofitting programs, hazard hunts, and neighborhood and family emergency plans.


Food Preservation: Dehydrating Frozen Vegetables

This is something I had never put much thought into, believe it or not. 

I picked up 2 bags of frozen veggies from Winco for a whoppin' $0.78 a piece!! Look out!! 


Just threw them on the dehydrator trays...


And a few hours later...


Voila! We have dehydrated peas and carrots!! 
I'm thinkin' fried rice... mmmmmm... 


In the photo above, you're seeing 2 small bag's worth. It would take probably 6 of those bags to fill a #10 can, which means you're looking at an overall cost of just over $5.00/per can (that's including the cost of the can and oxygen absorber.)

Dehydrated veggies like this, hermetically sealed, will last around 10 years. Not bad! Not bad!

Boiled a tablespoon of the little guys in some water, just to be sure I'd like them after they were reconstituted. 
Yum!!!
 

Saturday, March 5, 2011

Emergency Preparedness: Candles


Light is extremely important, both for physical and psychological reasons. Keep all the lights in your home off for 24 hours. I think you'd be surprised how gloomy a house can feel in the absence of light. Not to mention, if you were without light in the Winter in Oregon, you'd be sitting in the dark or going to bed at 4:30 pm. That doesn't sound appealing, even to me, and I go to bed at 9:00 pm most nights!  

You'll want to decide what kind of light is most appropriately suited for your family's needs. 
Here are some options:

Lanterns

  • kerosene: great light source - some models will burn around 70 hours
  • battery operated: convenient and easy to use, but require larger batteries
  • propane: easy to find, propane cylinders are easy to use

Flashlights

  • plug-in: great for short-term use, but no where to recharge - you would have to keep a good supply of batteries on-hand
  • hand crank: crank for 1 minute and get 30 minutes of light with no need for batteries or light bulbs
  • LED shake light: 20 minutes of light with 30 seconds of shaking, no need for batteries or bulbs
  • squeeze light: no batteries; just squeeze the handle repeatedly to generate light
  • solar powered: needs 6-9 hours full sun to charge, can use back up batteries, more costly than other choices
  • book lights: wonderful for reading, but not a good choice for other lighting

Oil lamps

  • Oil candles: small candles sell around $4, burn 100 hours, clear oil-less soot
  • Hurricane lamps: produce a lot of light, amount of light output is controlled-dim to bright, produces some warmth, oil easy to find at mass merchant
  • Light sticks: fair amount of light if very dark, safe for a child, lights up to 8 hours, around $2 each

Fireplaces

  • Gas models are very costly to burn, so stock up on firewood!

Candles

  • small stick: burns 4-6 hours, provides good light, but can tip easily
    pillar: burns 8 hours or up to 100 if emergency variety
  • votive or tea light: short life with wax puddles, but small enough to buy and store easily
  • fragrant/jar: soot and scent are drawbacks, they're expensive

Keeping all that in mind, our family decided to boost our supply with stick candles. The candles are going to supplement our 15 hurricane oil lamps. Some people dislike the smell of oil lamps, but I LOVE it - probably because I didn't grow up with it. :)


At The Dollar Tree in Springfield, they sell these packs of 6 Emergency Candles for a buck! What's even better than that is the fact that they sell them online at their site by the case, with free shipping if you have them sent to one of their stores!! $48.00 for 288 candles!! 

But what, really, does that mean? How many hours will one of those suckers burn? 

I wanted to know, so I conducted a little experiment!

I placed the candle in my butter keep, of course. Where else?

I lit the candle at 5:05pm and let it burn for 4 hours. Like I said, we go to bed around 9:00pm, so I blew it out at 9:05pm. Then, the following morning at 6:05am, I re-lit the little sucker. It burned with a solid flame for another hour.


Here are the results in simplified terms, and what they mean for you: 

1 candle = 5 hours of light
6 candles = 1 box 
48 boxes = 1 case

Which means... if I buy a case of these, and use them for around 2.5 hours per day, I will get 2 days' worth out of one candle. Which means... 

1 box will last me 12 days. If I continue this pattern... 

1 case of candles (for $48.00) will give me 576 days. 

And just for fun... 

$48.00 for 288 candles, at 5 hours per candle amounts to... 

1,440 hours of light, at $0.03 per hour of light. 

I'm a fan of those figures. 

One last note: While your family is making a decision on what kind of light sources to store, take a look at this video:


I've posted information about SoutherPrepper1 before - he's a regular guy, dedicating a lot of his time to prepping and educating others about the process. He's great! And in this video, he discusses several ways of storing/using light. 

Happy Prepping!! 


Friday, March 4, 2011

Waste Not The Wipes!!

**I took this post from our Family Blog. If a date/wording seems off, this is why. I wrote this post while I was pregnant with Trenton - last year!**

I have been extremely intrigued by a great many things lately... having a baby is an eye-opening experience of the best kind.

Countless topics have been discussed in our home over the course of the past few months, and bless D's heart, he has been right there with me, always supportive, going over pros and cons, always willing to be the other half (the sane half, really) of my "Oh I just read something else that turns my world upside down" conversations. Bless. His. Heart.

I will be posting several blogs over the course of the next few months (years) about eco-friendly kid raising. Yes, this farming, dirt loving, surely conservative woman just said the words (hyphenated word rather) "eco-friendly" and I plan on saying much more on that topic. The main idea is that I would like to protect my children. All of them. Even the girls. : ) As parents-to-be, we worry about some of the same things our grandparents worried about when they were raising their brood. However, we worry about much different things too. Things that, until late, have not reared their ugly heads for parents to worry about. We plan on doing all we can to give the Cherry Clan the kind of wholesome, homegrown, dirt-streaked life we enjoyed and love still.

Project #1: Reusable Wipes!!


I like to save money. "Like" may be the wrong word here... ummmm... I'm so cheap I squeak.

There I said it.

I'm also somewhat of a naturalist. A homesteader. A home-loving housewife.

All of the above.

Back to the wipes...

I first read this recipe on Progressive Pioneer, a wholly inspiring blog written by Amy Thompson. The woman has a soul of gold, to say the least. She shares great ideas for making the most out of raising your children, easy do-it-yourself projects, and if I start now I'll be here all day explaining the benefits of following her blog... so just do it. However, I will give the same disclaimer for her site as I did for the other... I am not responsible for the addiction that ensues after visiting her world. ; ) You can find her baby wipe recipe, among other great articles here.


Reusable Baby Wipes
______________________________________

What you'll need:

For the wipes -
flannel squares (to fit whatever container you'll keep the wipes in)
a serger (the other day I called my mom's a surge protector and I thought she was going to pee her pants)
a sewing machine (if you have one of the nicer four-spool sergers you won't need the sewing machine)

For the solution -
3 cups warm water
2 T olive oil
3 drops essential oil (mint, lemon, lavender, you pick!)
2 drops tea tree oil
2 T natural baby wash (preferably the no-suds kind... I'll tell you why later. Ugh.)


Step #1: Wash the fabric. You'll always want to wash fabric before you start working with it - especially flannel which can shrink up to 3" in the first wash. Dry on low heat, and you're ready to start cutting!!

Step #2: Cut your flannel into squares/rectangles that will fit into the container you're going to be storing them in. I used a BPA-free plastic container with a flip top lid. NOTE: you will want to cut the pieces about 1/8 of an inch larger (on all sides) than you actually want. The serger will take off about that much from each side. NOTE#2: The wonderful thing about flannel is that, if you start a cut at one end, the fabric will rip easily and give you a nice, quick, straight edge. Excellent!


The golf pattern - my dad would be so proud.


Is this not the CUTEST fabric for a builder's family? I'm in love.

Step #3: Double up the fabric. The flannel I purchased had a print on one side and not the other. The material is also softer on the printed side than the non. Because of that, I serge two pieces of fabric together - printed sides facing out obviously.

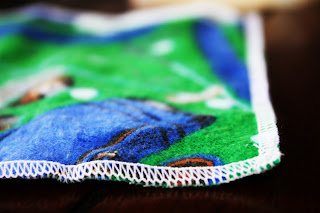
Step #4: Serge all four edges of the fabric pieces. Trim the tails.


Come back soon to see what I do with these scraps!! It's so exciting!!


Step #5: Because I was using a 3-spool serger, I ran a straight stitch down each edge (in the middle of the serge) just to insure that these bad boys would not come undone. Ever. If you've got a 4-spool serger you won't have to worry about this step. If you do add a straight stitch, just trim all excess thread from the wipes, and fold them so they're ready for solution!


Step #6: Make the "wet" part of the wipes...

Put all ingredients in the blender. NOTE: This is the reason you want a baby wash that doesn't create bubbles... I had a lovely explosion in my kitchen last night because I thought I could ignore Amy's advice on that.

Curiosity killed the cat.

And foamed the kitchen.

Step #7: Add your liquid to your wipes. I just put half the wipes in (I can fit 12 in each container I bought), added the liquid, squish squish squished, added more wipes, more liquid, etc until they reach desired liquidiness. Yes. Liquidiness.


What's amazing about flannel is that it holds liquid VERY well, but doesn't drip. Perfect.

Congratulations! You have reusable wipes!!


In the past 24 hours I have used mine to wipe a butt, wipe a counter, clean a picture frame, dust a piece of wood furniture, clean a dirty face, and polish glass.

Yes. I used clean ones for some *ahem* tasks.

Happy wiping!!

Emergency Preparedness: Homemade Firestarters

***This post was taken from my Family Blog. If a date/wording seems off, that's why. I wrote this post over a year ago!***

What to do? What to do? Every other day I have a stand off with the lovely, hairy, appetizing lint that comes from my dryer. It says,

"Throw me away. We both know where this is headed."

And I say,

"But I don't want to. You're mine. You're part of my clothes, my dogs, my dirt. I made you for goodness' sake! Can't I use and abuse you in some fashion?!?"

Yes. Yes I can. And so I will.

Dryer lint, sewing scraps, shredded paper for the love!! You can use it all to make your own firestarters!! It's a wonderful idea I tell you, and the ones we just made burned. They burned hot, and for a very, very long time. Excellent.

So here are the steps:

You will need:

Some form of flammable something (dryer lint, bellybutton lint - gross - or sewing scraps - best to use something that will catch easily and burn hot. Flannel seems to work really well)

Egg cartons (We used the kind with a flip top, but if you have the large, open-top flats, they'll work juuuuuust fine)

Paraffin (Paraffin is kerosene in it's solid form - it's the most common type of wax used for candles, lamps, etc. You can buy it online, or at places like Glory Bee Foods -
they have a retail location in Eugene and if you've never been there, the trip is a must. Also, if you've got old crayons laying around the house, they're made of paraffin. Use them! Melt those bad boys down and make them work for you!)

Step #1: Gather your material -

Our material came from two places...

The dryer vent...


And the wipes project I just finished...


Step #2: Place your material into egg cartons


Step #3: Melt the paraffin - Use crayons or commercial wax (a Number 10 can IN A DOUBLE BOILER on the stove works great for this! Be careful to sink the No. 10 can in water to melt the wax because if you put it on the stove directly it can catch fire. Not good.)


Step #4: Pour the melted paraffin onto the material in each hole of the egg carton.

(IMPORTANT NOTE: Put parchment paper or some other leak-proof paper under your cartons. They will leak. Oh and don't pour so fast that the paraffin sloshes out of the container and onto your stove and floor. You'll be scraping paraffin for years. Just ask my mom.)


Step #5: Let them dry and voila! It's a fire starter!

____________________________________________________________________

When you need to start a fire, you break a little section off (this is another reason to use egg cartons) and light it on fire! Mom said when she put a match to one after it had dried, it went up beautifully, burned really hot, and stayed burning for over 5 minutes. That's pretty dang good.


Food Preservation: Dill Pickles/Green Beans/Strawberry-Rhubarb Jam/Plum Jam

***The following post was taken from my Family Blog - if a date/wording seems off - that is why. This post was written last year!***


Mid-August in our neck of the woods translates: sticky floor, aching back, home as hot as Hades, and a stark reminder why we spend so much time tending to the garden.

I love canning.

Love it.

Did I mention I really love canning?

Here's a wrap up of the projects we've been working on lately...


QUICK DILL PICKLES

I get my dill pickle recipe from one of the greatest books ever written. Carla Emery, a brilliant woman to say the least, has since passed on, but her book - The Encyclopedia of Country Living - is ageless. Seriously, if you don't have a copy of this massive piece of literature, do yourself a favor and get one. The lady really floats my boat.


I like crunchy pickles, so I soak my cucumbers in culinary lime for about 12-18 hours before processing. Before we could get our hands on culinary lime last year, we crushed up a bunch of calcium pills and soaked them in a solution of calcium and water. It helped with the pickles' soggy nature, but not a ton. Wilco (owned by True Value) wound up ordering us a bunch of bags of lime, so now we're set!


Disgusting...


Repulsive...


GREEN BEANS!!


My green bean "recipe" comes straight from another of my favorite books... The Ball Blue Book of Preserving (don't laugh at the name - it's right there! I didn't make it up!!)


We add very little to our beans. They're canned in water and a tiny bit of salt - 1 teaspoon per quart jar to be exact. They process in the pressure canner for 25 minutes, and voila! You have GLORIOUS green beans. Holy moly no matter how many bean rows we plant, and no matter how many quarts we put up, we always seem to run out by December. We just can't help ourselves.


SIDE NOTE: Thank you, thank you, thank you Lindsay Surface and mommy for helping me snap beans this year! D was working and we had a great girls get-together. Woah. So many G's.


STRAWBERRY-RHUBARB JAM!!


My mom is famous in our family for her strawberry-rhubarb jam. I. love. it. My brother Chris has morphed his diet and nutrition into something I would never be able to tolerate, so this is the first year she hasn't shipped him some. I think I heard him cry a little on the phone when she told him what we were doing. Excellent. ; P


The recipe she uses comes right off the back of the MCP (pectin) box. One of the greatest lessons I have learned from my mother in the kitchen is this: always, always try the recipe on the box. So I confess... many of my best recipes come right off the boxes of the ingredients I'm using. I, too often, go searching for the best recipe online when, in fact, it's right there... right under my nose. Who knew?!?! Especially when you're making jam or jelly, the recipes on the table in the box are simply the best in my opinion, so we stick to 'em... sort of. ; )


We're apparently very thorough when using up the last of the batch... *ahem*


Hello love...


AND PLUM JAM... kind of.


I'm sure you all remember these gems from last year... my beloved plums. *sigh* I love plums. This year, the pear and plum trees blossomed right at the wrong time. It rained. It hailed. The bees never made it to them, and so, no plums. : (

Thank goodness, D had the sense to bring up the fact that we had 30 quarts of halved plums in the food storage room!! We didn't plan on turning these into jam, but we haven't used any of them - canning them semi-whole was more of an experiment than anything - so we got busy! The plums, though canned for a year, made GREAT jam and the juice that the plums were packed in made ever better jelly!! Score!!


D and I have one trick when it comes to plum jam... you may call it our best mistake in the world. We do. Last year, when we were making plum jam, and we were so googly-eyed about each other, giggling in the kitchen, dreaming of being husband and wife and the hundred babies we would have, we stopped paying attention to the recipe (*ahem* - I stopped paying attention to the recipe) and told D to add DOUBLE the lemon juice that it called for.

Yes. Double.

As it hit the pot I realized what I had done. We had not the slightest idea whether or not it would turn out. As it cooled in jars we watched, and we waited... And when it was all said and done, we had the best darn plum jam we'd ever tasted! It was lighter (in color and texture) than regular plum jam - our plums are dark in color and extremely firm and meaty. They make "man jam" so to speak... and the lemon juice added a tart tinge of flavor that was to die for.

So to make a long story longer, "our" recipe will call for double the lemon juice for the rest of our lives.


This is what happens when you have a bad ring. Yup. This bad boy exploded TWICE! I thought I had just lined up the seal wrong after it exploded all over the counter the first time, but when I tried it a second, we wound up with the same result. Bad, bad ring. : (


All in all we're happy with how things are going this year in the garden, though they may be slow...

Up next, potatoes, potatoes, potatoes... tomatoes, tomatoes, tomatoes!!